The Anatomy of a Cheese Plate

Entertaining is always fun and exciting. There’s nothing like hosting a festive evening at your home with food and friends in abundance. However, in spite of all the fun and excitement, hosting can be taxing…if you let it. Fear not! By understanding the simple anatomy of a cheese plate, you can turn a chore into child’s play.

I recently hosted some friends at my house for a little post-holiday get together. Having no desire to spend hours in the kitchen preparing heavy hors d’oeuvres, I opted for a quick trip to the market for some simple items to construct an impressive spread of a cheese plate.

Anatomy of a Cheese Plate

By gathering a few high flavor items, you can gracefully build an appetizing array of goodness that will keep your guests snacking all evening.  For the perfect cheese plate you’ll need:

  • The Vehicle – Whether a cheese board, a piece of slate, or a custom piece like I have pictured above, your vehicle should be large enough to house all your stackable sensations.
  • The Cheese – Most definitely the star of the show, you should always be mindful of flavors that will marry well with your other items.  When it comes to cheese, you often get what you pay for.  I opted for a mild brie that would provide a building block for flavor and an aged cheddar with a whiskey soaked rind that was full of flavor and sharpness.
  • Something Sweet – A perfect pairing with robust flavors like cheese is the natural sweetness of fruit.  Whether you want tartness with a Granny Smith Apple, subtle sweetness with orange slices, or vibrancy with plump grapes, fruit is always the perfect addition to your plate.  An alternative item, and quite the conversation piece, is natural honeycomb.  Pictured above in a separate dish, I chose to add another layer of sweetness with Savannah Bee Company’s Raw Honeycomb.  This honeycomb creates a perfect bite when coupled with a tart apple slice.
  • Something Crunchy – With all the sweetness and soft textures on the plate, provide your guests with some crunch by introducing something as elementary as nuts.  The salty, crunchy combination will create a nice bite for your party goers to snack upon.
  • Foundations – Not the star of the show, but definitely a huge supporting character.  There are a number of items that you can choose for your guests to build upon.  I simply used a heavy grain cracker and sliced french bread.

cheese tray 4

cheese tray2

cheese tray1

Entertaining made easy!  An impressive cheese plate with intense flavor combinations is sure to impress your guests while providing you with a stress free evening.  Take the plunge and gather your friends together for a cheesy evening.  A presentation like the one pictured above is a definite way for you to stay stylish!

Some Like It Haute

Winter activities and holiday festivities are in full swing!  During this chilly time of the year there are always fun events happening around every turn.  Whether you’re out for an old fashion evening of caroling or taking a spin around an outdoor ice skating rink, you have every opportunity to encounter Old Jack Frost.  After a fun outdoor outing, it is a necessity to have a winter warm up beverage.  It’s easy to head around the corner to a coffee shop for a seasonal treat, but why not turn this need for warmth into a party at your place by inviting your cronies over for a hot beverage that is sure to help them thaw out from the winter winds.

TSS Haute Chocolate Mix

This foolproof recipe makes a rich and robust Haute Chocolate Mix that is perfect for entertaining or to bag up, as pictured above, for party favors/office gifts.  This recipe is one that my mother has made from time to time and always hits the spot.  You can even turn it into a little Haute Toddy for the adults by adding something subtle like Kahlua.

Haute Chocolate Mix

  • 10 cups Powdered Milk
  • 1 large container of Cremora
  • 1 large container of Nestle Quik
  • 1 cup Powered Sugar
  • 2 Tablespoons Cocoa

Mix together.
To serve, fill cup 1/2 full with powdered mixture and add boiling water.

Words cannot express how much I love this Haute Chocolate.  There is such a full body flavor, with an indescribable sweetness that completely evokes the feeling of lounging fireside in a rustic lodge nestled among the snow capped mountains.  Aside from being utterly amazing, this is also a budget friendly mixture to have around the house for guests or to divide up among friends, family, and coworkers.

So instead of drinking out, gather the group at your house for some games, gossip, and cup of greatness.  Having friends over for the holidays doesn’t have to be elaborate and stressful.  Toss some cookies in the oven and bring the water to boil and you are set to combat the cold while you stay stylish!

A Stylish Steed Christmas – Day 10

Can you believe that it is already Day 10?!?!  The Twelve Days of Christmas are almost complete.  I hope that you have found some awesome things that you can incorporate into your holiday season.

With so much family time approaching, you are bound to have some quality gatherings around the dinner table.  Amidst the wonderful food and the seasoned conversations, what better way to bring in holiday cheer than with a beautiful tablescape display.  Creating a gorgeous spread on your dining room table gives beauty to your home, even when dinner is not the main event.

On the tenth day of Christmas The Stylish Steed gave to me, decor for my guests when dining.

I have created three different designs to fit the many needs of all of you out there.  You may find some pieces from each design that you would like to incorporate together.  Make sure that your design is congruent with your colors in the dining room.  Your tablescape will look best if all the color compliment one another.

The Rustic Look
Now you know I couldn’t create a tablescape without designing one in my favorite look.  The rustic tablescape goes perfect with my dining room colors and preexisting decor.

rustic table full

Beginning with a burlap feed sack as my foundation, I insert some boxes underneath to create different heights for my display.  Just like clothes hide a multitude of sins, your table covering will also hide your display secrets.

I decided to create a custom focal point this year from my holiday display.  I am in love with this rustic tree made from all things that are truly southern: magnolia cones, magnolia leaves, and cotton.

rustic tree

This piece was so easy to create!  I simply hot glued the magnolia cones to a purchased cone tree.  Because of the irregular shape of the magnolia cones, I inserted some leaves to fill in the holes.  Lastly, I adorned the top of the tree with cotton.  To bring in height and style, I placed this homemade creation on an old piece of luggage.

This piece could easily be duplicated using pine cones.  It is adaptable to fit your creative needs.

rustic table close up 2

Another great piece in this design is an old coke crate.  These are pretty easy to find at flea markets and antique malls.  They can serve a multitude of purposes and have such history.

rustic table close up 1

Inside the coke crate I placed a lighting element, some purchased ornaments, on old vintage inspired bell from At West End, and some rustic pears created by wrapping old light bulbs in jute.  Scatter some natural elements like the magnolia leaves and pine cones around and your table is complete.  I know I’m a little partial, but I absolutely love this display.  I can’t wait to put it out for real in a few weeks!

The Traditional Look
Some people are traditionalists at heart.  They can’t help it.  It’s nothing but turkey and dressing on Thanksgiving, cake and ice cream on your birthday, and RED and GREEN at Christmas.  If you are one of those, it’s fine.  I’m not mad at it.  I think it’s great to have those people in your life.  So this ones for you, traditionalists!

traditional table full

This tablescape screams CHRISTMAS!  Nothing but red, green, white, and an abundance of holiday elements.

traditional table close up 1

I decided that glass pieces would serve as my centerpiece.  After placing a beautiful tall red vase with a vibrant green jar, I filled a clear glass vase with mini marshmallows to add to the texture of the design.  I brought all three pieces together by tying a bow on the marshmallow vase.

traditional table close up 2

I balanced the large vase full of ornaments on the right with a great golden tree with jeweled details.  This gem of a find was less than $10 at Pier1 after Christmas last year.  Take advantage of those “after Christmas” bargains!  You can find great items like ribbon, decor, and wrapping paper for a fraction of the price.  Put it away in storage for next year…it’s not like it’s going to spoil.

After the placement of some ornaments and fresh greenery, I am ready for those reindeer to pause on my roof!

The Whimsical Look
This look is so much fun.  It’s vibrant colors and whimsical look makes me smile when I see it!

*Remember earlier when I told you to bring in colors that matched your dining room?  This is why!  Please disregard the clashing of color in this photo.  Concentrate only on the table design.  I repeat, focus only on the table design!

whimsical table 1

After draping my pink fabric over a white tablecloth, I was ready to build my display.  I opted to flank the centerpiece with matching over-sized wine glasses.  I filled the glasses with ornaments and allowed them to be statement pieces on their own.

whimsical table 2

The centerpiece trees are handmade and cost less than $10 combined.  The same tree that was used above was used on these.  After painting a solid coat of paint on each cone, I secured the glistening glitter with spray adhesive.  Elevating one of the trees on a clear candlestick holder keeps the table interesting.

Last but not least, I draped two different ribbons around the tablescape to add dimension and color.  A great printed pink and an iridescent silver were the perfect combination for this design.

Now that your table is ready for guests all you need is a dinner fit for a king!  I hope you enjoy creating a tablescape that will bring your family and friends together during the holidays.  I had such a fun time creating these and hope you will too.  Please don’t hesitate to share photos of your own creations!  I would love to see your Christmas creativity in action!  Until next time, stay stylish, my little elves!

Also….if you need some great ideas for that dinner, check out my awesome friend Rebekah Faulk.  She has the perfect herb roasted pork that will have all your guests asking for seconds.

A Stylish Steed Christmas – Day 9

Christmas may be the most wonderful time of the year, but it is also the most expensive time of the year.  With parties, gifts, charities, and more, the bills can sure add up quickly.  With the impending debt that you see adding up before you, let’s look at some décor for our home that won’t break the bank.  In fact, these impressive additions to your home might not cost you anything at all.

On the ninth day of Christmas The Stylish Steed gave to me, décor for the penny pincher in me.

We all have things lying around the house or garage that we don’t use.  In many cases, it is leftover items from a weekend project or an activity from the warmer months.  What better way to save money than make some beautiful display pieces from items that are doing nothing but collecting dust.

Stacked Tree
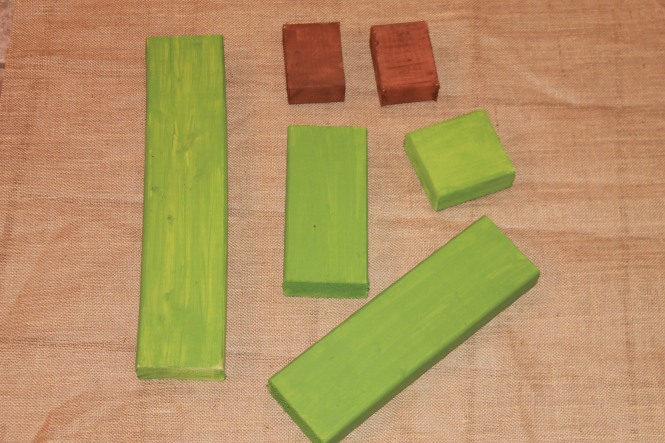
If you’re like me, I always over-estimate when it comes to purchasing supplies for a project, and then, in turn, am left with tons of leftovers.  That scenario was what brought me to create this great stacked Christmas tree.  Using leftover lumber, I am able to bring a personalized piece to my home décor for Christmas.  I had some extra scrap pieces of 2×4’s from a weekend project.  You can do the same with your scraps.  You will need six pieces of wood in the following lengths:

(2) 2 ½”
16”
12”
8”
4”

After cutting the pieces to the appropriate lengths I painted the two short pieces brown and the remaining pieces in a leaf green.

IMG_8923

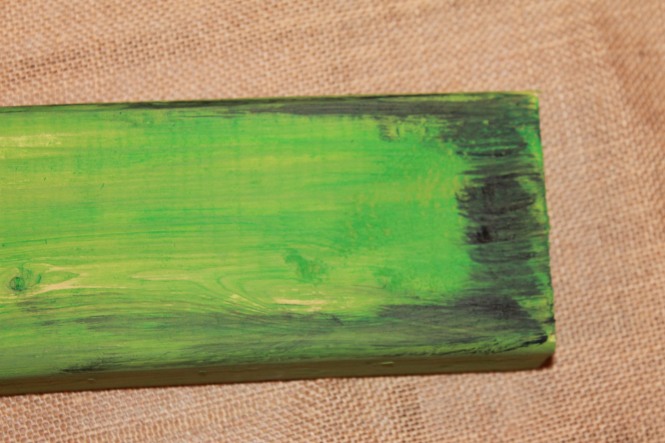
After the paint was dry I added an aged look to the wood by painting black on the edges and smearing it with a wet paper towel.  Always remember to rub the paint with the grain of the wood.  This wet rubbing will also give you the opportunity to take off some of the green paint to add to the weathered look.

IMG_8924

When the distressing was dry I measured and centered the boards atop one another and secured them with hot glue.

IMG_8971

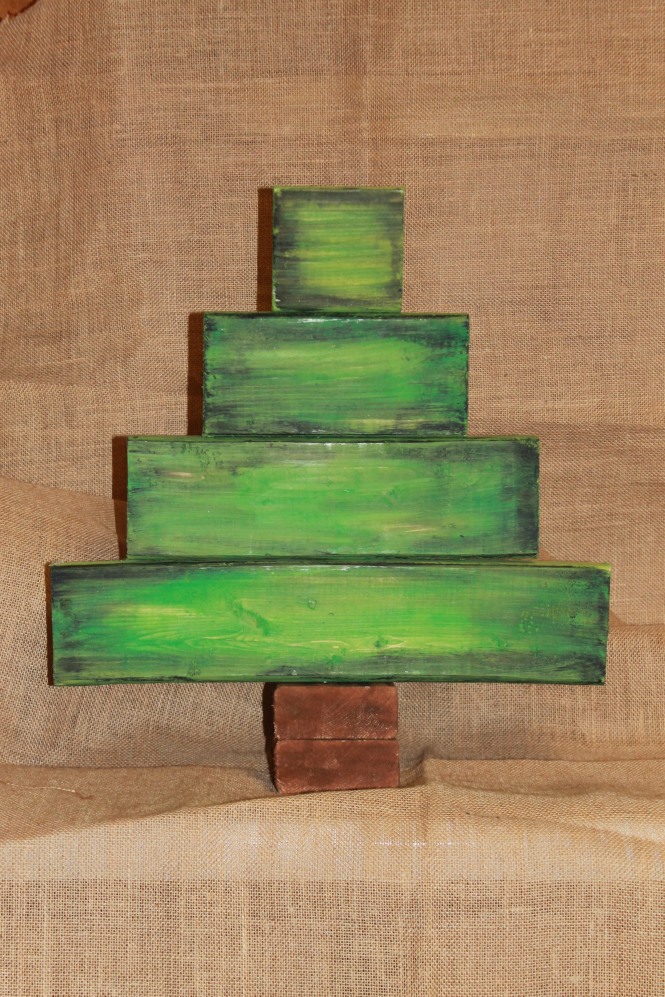
Now you could leave this tree just as it is, but I decided I needed a little more personality.  I decided to write a holiday message on mine.  After painting my words and some details of dots and stars, I hot glued a star cookie cutter to the top.   It was now ready to display.

IMG_8970

The only cost I had in this project was my cookie cutter, which was less than $1.00!  You can’t beat that with a stick…or a scrap piece of 2×4.

Tomato Tree
This summer I decided to try my hand at gardening.  For the first time ever I grew tomatoes, banana peppers, and bell peppers.  For the most part it was a huge success.  My one little tomato plant produced enough tomatoes to feed a third world country for at least 6 months.  Needless to say, I spent my summer giving away tomatoes to anyone who passed by.  However, now that the first frost has come what do I have left?

tomato cage

A great way to re-purpose out of your garden is by creating this tomato cage tree.  By using that old tomato cage, you can transform your gardening garbage into holiday works of art.

The first step in your creation is securing the top pieces together with wire to form the point of the tree.

tomato cage top secured

Next, I chose a fabric that would best coordinate with my decor.  I went with an inexpensive muslin material because you know I love my rustic looks.  Beginning at the top of the tree, I attached four long strips of fabric to the top of the tree with jute.  I made sure that each strip was lined up with the vertical support of the cage.

tomato cage cloth top

Allowing the fabric to billow, you will work your way down the cage, attaching the fabric along the way to create a billowing effect that will look like snow laden branches.

tomato cage billowing

(Pardon the blue glow.  I was watching The Real Housewives of Atlanta while I worked on this.)

When you have reached the bottom of the tree, cut off any excess fabric to insert later for filler.

tomato cage billowing complete

When all four vertical pieces have been secured, you then use the same process to fill in the gaps with the excess fabric.  When the filler pieces are inserted, you have yourself a finished tree!

tomato tree completed

To give your tree a more natural look, consider inserting branches or leaves to the design.  Something like pine branches or magnolia leaves would be a great addition.  I think inserting pine branches in a tree wrapped in light fabric would give the look of a snow cover pine tree.  You can even choose to wrap the cage in lights before adding the fabric to give your tree a glow!

If you are placing this outside, you may find it useful to insert it into a large pot to avoid any wind from blowing it over.

I am sure that you have seen a similar process done with tomato cages before.  Most always, these trees are done with deco mesh ribbon.  I, personally, am not a fan of the mesh ribbon because EVERYONE uses it for wreaths and decorating.  I chose to go with the fabric and also used a technique that I have not seen before.  I love the outcome of this tree.  I am sure it will look great on my front porch.  Who knows…you might get to see it later!

O Christmas Tray
(You sound like a true southern when you read that out loud)
Another great recycled project is this tiered tray tree.  I am sure that all of you have a similar display pieces stowed away in a closet somewhere.  Maybe you have used it to display cupcakes at a party.  By adding a few little touches of Christmas cheer to this tiered tray, you create an instant centerpiece for your dining room or a great addition to your coffee table. 

This project is super easy and only requires a few items.  I chose to tie strips of muslin and burlap to the edges of my trays.  Next, I simply placed pine cones and Christmas ornaments in each of the trays.  Your finished product greatly resembles a beautiful Christmas tree.

tiered tray tree1 tiered tray tree2 tiered tray tree3

Of course mine is a little rustic.  You could easily create yours to fit your decor.  A little spray paint and glitter on the pine cones would completely soften the look of the entire display.  Add some beautiful blue and white ornaments and attach some snowflakes or glittered ribbon, and you’ll be walking in a winter wonderland all season long.

Three great ideas that are high impact and low-cost.  I love all of these pieces in my home for the holidays and hope you enjoy them as well.  Look around your garage and basement and see what “junk” you can use to recreate an awesome piece for your holiday home.  Until next time, stay stylish!

A Stylish Steed Christmas – Day 8

Don’t you just love Christmas? And by Christmas, of course I mean gifts!  Gift giving (and receiving) is one of my favorite parts of the holiday season.   Whether it’s a small token from a coworker or huge gift from a loved one, receiving gifts always makes us feel good.  Even more than the gift itself, I enjoy seeing the creativity that people have when wrapping gifts.  That enjoyment was probably instilled in me by my mother who ALWAYS has elaborately wrapped gifts with huge decorative bows and colorful paper.

When giving gifts to special people in our life, an ordinary wrapping job doesn’t always seem adequate.  There are some people for which we feel the need to go above and beyond.  In those certain situations, I like to incorporate things that are tailored specifically to that person, maybe something associated with a hobby or interest they have.

Here are some unique ideas that will get your creative juices flowing as you prepare to get wrapped up in the gift giving season.  These options, of course, are not for all your gifts under the tree, just those extra important people that you have on your list.

Bling in the Season
This option would be a great idea for that glamor girl in your life.  I know my mother would be someone who would love to receive a gift wrapped like this.  That one person that always has a little glisten or is (no offense, Mom) a little over the top!  Including eye catching jewelry in your wrapping is sure to set your gift apart.

I think that a bright, solid color paper works best for this wrapping.  I chose a bright red and a vintage gold for my two gifts.  An elaborate ribbon is the best thing to frame the jewelry that you will use.  This piece of jewelry may be a vintage piece that you want to pass down to a family member or just a flashy piece of costume jewelry that your gift recipient would enjoy wearing.  After the bow is tied just pin the broach to the center and expect a great reaction as soon as they see it.

photo (13)

photo (12)

photo (11)

I also incorporated a vintage pendant on a gift bag.  Using the same ribbon that secures the handles, I simply tied the pendant to one side of the handle.  It’s a great addition to an otherwise boring wrap job.

photo (14)

photo (15)

A Natural Decision
I love the rustic feel of this wrapping.  This would be great for any guy on your nice list or that special friend who is a lover of nature, or enjoys the primitive, vintage styling.  After wrapping your gift in brown craft paper (you can purchase it for $1.00 at The Dollar Tree), secure an element from nature with a strand of jute.  Great ideas for this would be an herb like sage or rosemary, a piece a pine branch with a pine cone attached, eucalyptus, or a flowering plant from your yard that dries well, like the lavender pictured below.  To add an extra pop of interest, consider tying a simple ornament that can hang from the closure.  I really love old keys.  I chose to hang a vintage skeleton key from my ribbon.  This might be might favorite package ever!

photo (8)

To this cotton package, I added a few pieces of red and green ribbon to give it a little more color.

photo (9)

photo (10)

Stamp It Out
Feeling the need for my DIY spirit to be satisfied, I went to my craft closet for my acrylic paint.  After digging around in the kitchen I found this star cookie cutter.  After cutting my wrapping paper to the appropriate size, I stamped the cookie cutter design onto the paper using the paint.

photo (7)

After the paint dried, I tied a flashy bow and it was ready for delivery.

photo (6)

You can really go wild with this and make unique geometric shapes by overlapping your prints.  Something as simple as a round biscuit cutter would make a beautiful design.  You can use any paper for this, but a solid color will work best.  You could even use the craft paper from above to create a one of a kind piece.

There are also some awesome online companies that create custom wrapping for you.  You can upload an image and customize Christmas with your favorite family photo or holiday design.  These can be a little pricy, but are really neat to have under the tree.  You can search these online, but a cool site with other customizable items is Zazzle.  They have tons of products that you can create.

So there you have it!  White boys can wrap!  I’m living proof.  I hope you are able to incorporate these and other ideas into your holiday wrapping this season.  It is sure to be impressive to your friends and family, and tons of fun for you!  Never miss an opportunity to stay stylish…even in your wrapping!